All posts by Pete

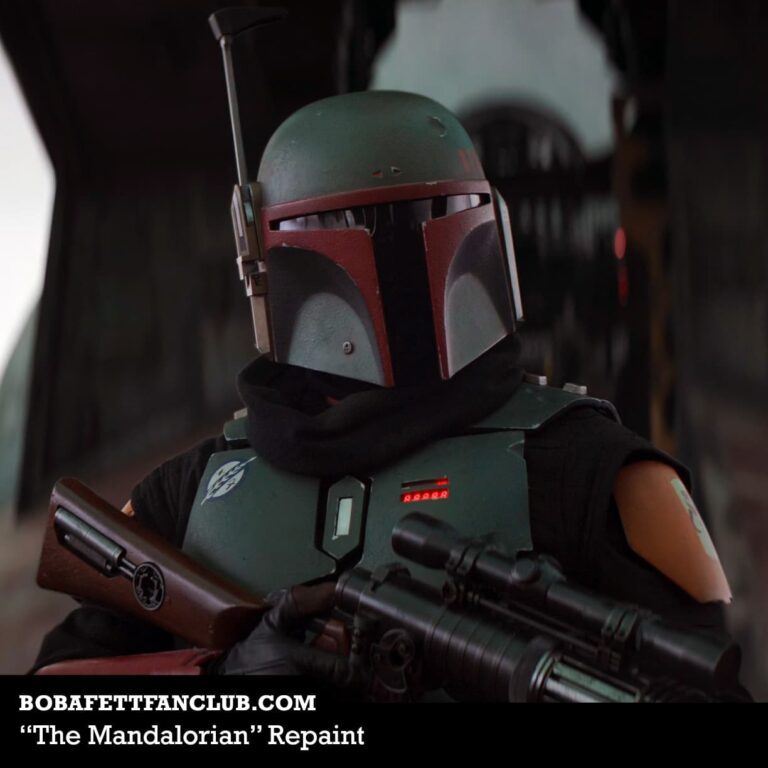
Boba Fett Cosplay: My First Build for Myself

I have made props for display and costumes for others for a while. I always enjoyed going to comic cons and renaissance faires, but I had never dressed up. I planned on it many times, but something always got in the way. When I watched Season 2 of The Mandalorian, I knew what my first build would be. Boba Fett.

Not the Fett we are looking for

When we first saw Boba’s armor, it looked awesome. I was sold. The only problem, it wasn’t Boba. As we soon found out, it was Cobb Vanth. A few episodes later, Boba shows up draped in black and more vicious than ever. Where Din Djarin was the finesse fighter, Boba was the sledgehammer. Before long he had donned his armor once again and he did not disappoint. I revisited my previous plan and now had my sights set on the REAL Boba. His armor was damaged. Most of the paint had been eaten away by the acid of the Sarlacc pit and whatever events it had been through since we last saw it almost 40 years ago.

The return of Boba Fett and the reuniting of him with his armor.
https://media.comicbook.com/2020/12/star-wars-the-mandalorian-season-2-boba-fett-1248448.jpeg

Boba so fresh and so clean, clean

A few weeks later, and another episode comes out. The ramp of Slave 1 is down and we hear Bill Burr rambling as he does from time to time. Boba comes walking down the ramp, flanked by Fennec Shand. His armor is completely repainted and looking amazing. The yellow kill stripes were replaced with red ones. The original grey flak vest, now black and black robe-like garments take the place of the original flight suit. I was blown away.

Boba Fett comes down the ramp of Slave 1 and we get the first glimpse of his new repainted look.
https://www.bobafettfanclub.com/costume/images/variant-themandalorian-repaint.jpg

Each time I had seen him, I thought he looked awesome and there was no way he could look more awesome, but then time after time I was proven wrong. This was it, “Boba Fresh” was to be my first cosplay build.

Setting a goal and getting started

I spent my time doing research on the armor and how it was supposed to look. I watched YouTube videos of scenes from the Mandalorian where the Boba Fett could be seen in action, took screenshots, and hunted down every reference image I could find to help me understand how to make this all come together. My goal, be ready for Comicpalooza 2021 in Houston. Now I can’t tell you how this story ends, because we haven’t made it there yet. I did intend to do my best to document the making of this costume to aid others who want to go down this path in the future, and I still do.

https://youtu.be/l_OCHjazMs4
Not sure how many times I watched this video.

I originally intended to document my process as I did it. I forgot that it about doubles how long it takes to actually do something. With Comicpalooza fast approaching, about 3 weeks away as of the writing of this post, I knew a complete account of the process was not going to happen. I am doing my best to take some photos and make updates on my social media, but an in-depth look at the process, no way.

Turning my failures into your successes

So I have decided it will be a retrospective. I will go back and look at each part of the process and put together guides on sourcing and making each part, compile my lessons learned, and talk through the tough points. I’ll include links to the products I found to work and plan to make videos showcasing and walking through the techniques I used.

I imagine there will be more people looking to recreate this look in the near future especially with The Book of Boba Fett coming out this fall. Hopefully, my series on how I brought him to life will be of assistance to those who decide to go down this same path.

‘Til next time, stay awesome,

Pete

May the fourth gave us the bad batch and I finally got my 3d Printer set up to print their helmets

May the Fourth, international Star Wars Day, came and went. With it, we saw the premiere of Bad Batch. If you have been living in a Sarlac pit, everyone’s favorite group of rejects from the last season of Clone Wars got their own show.

It was a good episode, longer than I expected at around 71 minutes. I will avoid spoilers for the moment, but not for long. I plan to give a synopsis of each episode the week following its airing to give everyone a chance to get caught up.

The original plan was to try and get a full set of the Bad Batch’s signature helmets printed up and finished prior to the debut of the show, but life happens. I did get my brand new Ender 5 Plus set up in a temporary home this week. So instead of my previous plan, I will be printing the helmets and working on them throughout the season. There are 16 episodes planned, so that should be plenty of time to finish all five helmets.

I got some pretty awesome looking files from Galactic Armory. I will reserve judgement until I get them printed, but the first impression are good. He just finished Echo as well. Swing by and check out what he has to offer.

First up is Hunter. It is printing as I write this. I will be posting a guide to how I do the paint and finishing for each helmet. I am also working to provide a time lapse and video guide as well. Those will be found on the Pete Things Youtube channel.

The thought is, pending nothing unforeseen, to have the first helmet finished by next week, so look for an update on that soon. I am super excited about finally being able to show you all what I have been up to. Wrecker will follow and that should be over the following few weeks.

Getting the shops up and running has also been a priority lately. I broke my toe a few months back, so it has slowed down progress. This is the reason for the temporary home for the Ender 5. I just couldn’t put off getting started anymore. It’s not perfect as a professional shop, but things are still progressing!

I am also working on something special. A display inspired by Cara Dune, so stay tuned. Speaking of Marshall Dune, there are also some rumblings that she may be making a return to Disney/Lucasfilms, but we will have to wait and see. NatGeo is going to move ahead with airing the Gina Carano episode of Running Wild and her merchandise is starting to show up on shelves again, so the rumors may have legs.

So, that is what I have been working on. I am trying to keep up with producing content, and that should be easier with the new printer. Hopefully, I can find time in there somewhere to put together the Lego sets I have been sitting on. I have the Razorcrest and Mos Eisley Cantina to put together. I will be doing a build video and a review for both of those as well.

Until next time. Stay awesome!

Pete

Getting back into prop making: printing, prepping, and overcoming some errors

I’m back at making props again. I had a little break from it, but now that I have my 3D printer set up in the temporary workshop (kid’s bedroom), it became easier to get back into! In this blog post, you will see me getting these two blasters from Star Wars The Old Republic ready for sanding and filling. The first step is printing them and I definitely had some issues during the printing process with each of the blasters.

These blaster files are available for free at Mynock’s Den. They are both weapons belonging to characters from the game Star Wars: The Old Republic. The first blaster belongs to Shae Vizla, a bounty hunter in the service of the Sith Empire. The second blaster is one of a pair used by Eleena Maru, love interest of Darth Malgus. He actually killed her because she was his only weakness, but I digress. Anyway, go take a look at the files, and many thanks to Mynock’s Den for making them available.

Shae Vizla blaster assembled to test fit.

Errors and Issues

One of the blasters had quite a bit of shrinkage, which caused the print to pull up from the bed. I adjusted the settings on the second print and the problem was mostly eliminated.

The second blaster had its own set of problems though. About 75% of the way through the print, the filament got bound up and failed to feed. I was checking on the prints pretty regularly, so I caught it fairly quickly. All but two of the objects had completely printed. After some thinking and research, I decided to move the head to the final printed layer and record the Z position. This told me the height of the final printed layer, 64.993 mm.

Moving the print head to the last printed layer position, I was able to notate how far into the print was.

I removed the completed prints and the two partial prints from the bed and releveled the bed. In the slicing software, I put the two models on the bed in the same orientation as they were in the previous print. I moved the models down the same distance as the final Z position of the last printed layer, (63.993 mm) and performed a slice on the x-axis removing the lower part of the model.

I then uploaded the file and printed the parts. After the prints were completed, I acetone welded the second print to the partials from the first attempt. I have to say I am pretty happy with the results. Now I have another technique to help me recover failed prints in the future.

You can see the seams from the acetone welds. The to parts of the print went together pretty well.

The plan is to finish each of these blasters slightly differently. I will be experimenting with a variety of methods to smooth the blasters. This includes using an acetone slurry, vapor smoothing, and sanding by hand or power tool followed up in Bondo and glazing putty at later stages for filling any imperfections that remain after initial prep work is done. My hope is the acetone treatments will reduce the need for Bondo and glazing putty.

The sanding process is generally the most time-consuming part of finishing a print. It’s also where mistakes like cutting too deep into surfaces or gouging out entire sections tend to be made. Uneven pressure or galling on the paper can cause the process to take even longer. The smoother the print and the less visible the layer lines going into the sanding process, the less time this will take.

Another of the main problems with the sanding and filling process is it is very easy to remove details or fill them in with Bondo. The same can be said with acetone. A loss of detail can occur depending on how long the print is exposed. The goal here is to find a happy balance and reduce the finishing time.

Blaster parts straight off the printer. This blaster will be smoothed using vapor smoothing in approximately this configuration.

Stay tuned for the results of my acetone finishing. I will also cover sanding and filling in the next post. These are just test runs to knock the dust off of my making skills and prepare for a big upcoming project.

Bad Batch launches May the fourth. I have purchased the .stl files for the Bad Batch, minus Echo, and would like to try to print and finish all four prior to the launch. I realize this is an unreasonable goal, but a guy can dream. My new Ender 5 Plus is still in the box, so that could be a problem. Anyway, until next time!

Keep making and stay awesome,

Pete

Getting started in 3d printing: 6 tips for a successful print and a look at my Post-process

3D printing has become a very popular hobby in recent years, as the technology has improved and become more affordable. It is not uncommon for people to purchase 3D printers for less than $500 these days, with many models available on the market that will work great for beginners. In this article, I am going to give an overview of my project process for doing props.

Printing

Printing is pretty much a :”set it and forget it type of thing.” Monitoring your print is a good idea in the event there is a failure, but most of the ways you can improve and increase the success rate of you print is in the setup and preprint part of the process. Here are some tips to help.

TIP #1 The right filament

First, it is important to make sure that your printer has the correct filament for the project use. If you are printing something that will be outside or exposed to heat, printing with PLA (Polylactic Acid) is not a great idea unless you reinforce or do some additional steps. ABS (which we will be using) however, has a higher heat resistance and works great for props. All of these tips are with the understanding we will be using ABS.

TIP #2 Plenty of fresh air for you

Good ventilation – safety is always important and there are many things that can happen while printing with ABS, from the material melting down and releasing toxic fumes to it just smelling like burnt plastic.

TIP #3 Less fresh air for your print

Enclosures and draft elimination- Draft elimination is important as it may cause the plastic filament to lift up from your print bed and cause issues with sticking. Enclosures can help eliminate draft as well as maintaining the proper temperature.

TIP #4 Bring the Heat

Proper temp – ABS should be printed at 230°C and your bed temp should be set around 105 to 110.

TIP #5 Go make your bed!

Printing surface – a good, level print bed is important because if it’s not then your part may be off-center or have warping around the edges. Also, ensure to level the bed prior to each print. Tape, hairspray, and acetone slurry can help with bed adhesion if issues arise.

TIP #6 To support or not to support, that is the question

Positioning and supports – positioning the model on the bed can help eliminate the need for supports in many instances. Sometimes the need for supports is unavoidable. Minimizing supports will help reduce your workload in post-processing.

Post-processing

Sanding

Sanding is a good way to finish your print. Starting with sandpaper use should be rough grit (60-80). This will remove the majority of any marks left by support material and other imperfections that may have occurred during printing, such as stringy bridges, unwanted infill layer patterns like honeycomb hexagons which can, or layer lines left from the printing process. Finish it up with a 220 and that should be smooth enough for most prints.

Filling

Acetone slurry, bondo, spot filling puddy, and filler primer will be your friend for the larger imperfections that cannot be dealt with by sanding alone. After you use these, it is back to sanding.

Finishing

This is the fun part! Now that you have finished sanding your project it’s time to give it that straight off-the-screen look.

Painting

Acrylic paints, spray paint (primer and color), lacquer. – Don’t dismiss rattle cans, they can have great results. Warming the can up by putting it in a bucket of warm water prior to painting will help with a smooth coat. Try to pick an area that isn’t overly hot or dirty. Make sure you have a surface protector down and your PPE. Start by laying nice even coats from about 12-16 inches away. Be patient, let the layers dry well before continuing to add additional paint or weathering effects (they’ll peel off).

Weathering

My absolute favorite part. Weathering is a technique used to make objects look old, dirty, and weathered. You can use paint or pastels for this process as well! Graphite powders, black/brown washes, and wax paints like rub-n-buff yield great results.

This is an overview of my process. I will walk you through a more in-depth look at my process with a couple of models I am currently finishing up printing. I will go step by step with pictures and tips. If you want to download the awesome models I will be using (did I mention that they are free?) swing over to Mynock’s Den. He has been gracious enough to provide a couple of blasters and they look awesome. He already has the files laid out, so the only thing required would be to break it up to fit on your bed.

So stay tuned for more updates as they come in! My process is not 100% perfect, but it’s what I have found works best for me so far and I am always striving to perfect it. I’m always looking for new techniques and ways to get better and improve, so if you have a suggestion, leave a comment and let me know how I can keep getting better.

Til next time, keep making and stay awesome,

Pete

How to decide what the best cordless tool brand is for you

When I started buying tools for myself, I really did not know what I was doing. My process evolved as grew older, but there really was no direction in the beginning. Then there was not a method or thought process in my purchases, it was just I had a project that required a tool, so I purchased the cheapest tool I could buy. 

As I grew older and started working in pawn shops, my process went to “oh, look a shiny new tool came out for sale and it is a great deal.  Add to cart!”  I bought so many tools that I had limited knowledge of or purpose for.  At that time I lived in an apartment and my haphazard method of purchasing just ended with me being a tool hoarder for a bunch of stuff I really didn’t have a use for at that point. 

I moved that pile of tools with me from apartment to apartment, and eventually to my house.  Some tools were lost or damaged along the way, gave some away to friends who needed a particular tool or just sold some at garage sales. 

Fast forward to the present and I have gained quite a bit of experience with tools.  I have worked on helicopters and other vehicles, built props and furniture, and even done custom cabinets, home repairs, and remodels.  My knowledge base has grown immensely.  This time around, I started buying tools with purpose.  Not only did it have to be the right price, but more so, it had to be the right tool.

Starting out in cordless tools

The first cordless tool set I bought was from a thrift store and the batteries were both busted.  It was one of those 5 tool combo kits and they had no idea if it worked or not.  I took a gamble and picked up the set for $25.  Come Christmas time, Home Depot had their holiday sale.  I scooped up a few of the battery multi-packs and boom, I was in business.  I still have that set, 8 years later.  All in all, I had a five toolset that served me well for under $100. 

As I grew further and my income started to increase as well as the use of my tools, I started exploring more expensive and higher-end tools.  First I purchased based on warranty.  I wanted the tools with the best guarantee.  As I continued to use my tools more and more, I started to care more about versatility and usability which makes sense.  I am going to concentrate on the three tool manufacturers I own and use on a regular basis.  There are others I will touch on them, but I will concentrate on Ryobi, Ridgid, and Milwaukee.

Ryboi

The first set I bought from the thrift store was a Ryobi set.  As I stated, I still have it and it is still going strong.  I am not particularly hard on the set or do much heavy lifting with it, but it definitely serves its purpose.  When I “upgraded” to a higher grade of the tool, I considered getting rid of the Ryobi stuff.  Why would I need to mess with another set of batteries and chargers?  It just seemed like more of a headache than it was worth.  Then it hit me.  Why not make that headache work for me? 

What I mean here is how many times have you gone looking for a tool and it has been taken by someone else or even yourself and left where the work was performed.  The one I get the most is a tool that got taken from the shop to the house, and it ended up being put away at the house.  I ended up making the Ryobi set my house set.  All of the batteries, chargers, and tools live at the house.  I have done this with a lot of my tools as I have upgraded.  The older tools become the house set.  No more running back and forth or tracking down a tool.

Ryobi makes a great set for the average homeowner or hobbyist.  They have a crazy number of tools and a bunch of specialty tools that aren’t made by many other manufacturers.  They target homeowners and hobbyists who need a wide array of tools, aren’t extremely hard on them and don’t want to break the bank. The tool availability is all over the place. They have everything from caulk guns to chainsaws that all work off of the same battery.

Even though I don’t buy Ryobi cordless tools for any of my shops or crafts nowadays, I do still make the occasional purchase when it comes to working around the house.  I grew up in the time when you avoided electric yard tools like the plague, especially cordless ones. 

The new Ryobi cordless chainsaws, blowers, and trimmers are really convenient.  They work off of the same batteries as the rest of the line-up and just make the small tasks easy.  Don’t get me wrong, if I am cutting down a tree or cutting down a bunch of brush, I am gas all the way.  More often than not, I am just cutting off some small limbs, cutting up a downed branch, or trimming a small area that needs to be kept in check.  Those are the times where these tools shine. 

The setup is basically nonexistent and there are no concerns over old gas, cracked hoses, or any of the other myriad of problems associated with gas engines that don’t get used regularly.  To add, I am still only using the standard tools, I haven’t even tried out the brushless versions yet.  My friends that have them swear by them and that will make me give them a look when it is replacement time.

Ridgid

What really drew my attention to Ridgid initially was the warranty.  While I have never used the warranty, it was definitely a confidence-inspiring program that made me feel better about investing my hard-earned money into the product.  Ironically the only ones I have ever had issues with were ones that I did not register.  I purchased a drill/impact combo and did not think to register it.  One of the two batteries that came with it died after a few months and never would take a charge again.  The other was an orbital sander that I had purchased used and the pad broke down.  I have no idea what type of life it had before I owned it, so I can’t hold that against them.

When I really started to focus on buying new tools, Ridgid was who I decided to go with for the aforementioned reason.  I only bought tools that I really needed at that point.  I did not reach for tools I would use occasionally.  If I was paying the new price, I was going to use it every day.  I ended up with 6 or 7 tools that I used frequently.

In general, the tools are well made, tough workhorses.  They have some unique features and geometry to them that can make for interesting ergonomics.  They come with a higher price tag than the homeowner class of tools, but that price tag comes with noticeably more power and torque.  There is a decent selection of tools available.  They offer 18v and 12v tools.  I own a few of both and have been equally happy with them.

Milwaukee

I pushed back for a while and stuck with my mixture of used tools.  They did a lot of what I needed to do and performed well.  I had friends who had moved onto Milwaukee a few years back.  Every time I stopped by, they would have some new crazy niche Milwaukee tool.  They were more expensive than what I was used to, so I held off and just kept chugging along with my pawnshop specials.  One weekend Home Depot had a sale with a bunch of combos and extra batteries during the holidays.  The variety of tools was too much, I jumped in with both feet and there was no looking back.

Milwaukee has taken over as my primary tool in my shop.  They have gone insane with cordless and taken it to the next level.  While they do provide cordless miter and table saws, I am a plug-in guy when it comes to those types of tools. Maybe one day they will convert me to full cordless, but at this point, I have no reason to convert.  For my purpose, I focus on their hand tools.

They offer both 18v and 12v tools.  Personally, I was shocked by the 12v tools they offer.  They are lighter and more often than not have enough power to complete the tasks I have around the shop.  There are tons of tools available in the lighter 12v.  They even make a heated jacket that uses the batteries for God’s sake! 

Just to be clear

No tool brands sponsor or support me, this is just based on my own personal experience. I still use and own other major brands including Makita, DeWalt, Grizzly, Jett, and Rikon, but they just happen to be corded. It just happens that I really like the variety of offerings from Milwaukee and they serve my purposes better. This will all depend on what your requirements are and what purpose you need your tools to serve. You are the only one that can make that assessment. Hopefully, this gives you a different point of view and insight into my strategy when building my cordless collection. Until next time keep making and stay awesome!

Pete

A little inside information on buying from a pawnshop

Previously had written a post about my favorite sources for tools. Pawnshops are probably my favorite spots for deals and not just tools. There are a couple of different categories of pawnshops and those are corporate stores and privately owned stores. In this post, I am going to dive in a little more and give a little insight into how pawnshops work and the strategies I use to get the best deals I can.

First we will take a look at the corporate stores. These would be your Cash Americas, EZ Pawns, etc

Corporate stores have huge databases that price and value the items they take in and sell. These databases are only as good as the information that gets put in to identify the items. These systems are kept fairly up to date which makes it more difficult to find smoking deals.  However, the databases are only as good as the information that they get fed, and it’s not always inputted correctly. Generally, if something is ridiculously off in price, you can blame that on an incorrect model number, brand, condition, etc. 

These corporate stores can get penalized for keeping stock on the shelves for extended periods. The longer an item goes without selling, the worse it looks on the store manager. “Aged” merchandise in a pawn shop is going to be the main source of smoking deals. A real niche or specialty tool is a prime candidate for becoming aged merchandise–there are fewer people looking for it, and so it just won’t sell.  The longer it sits, the better deal you can generally get on it.  Some corporate stores actually get charged a penalty for items on their aged list, or the list might even be tied to the manager’s bonus. The manager wants to get that stuff out of the store, help them do it!

Privately owned shops are something like “Jim Bob’s Gun, Pawn, and Haircare”. Ok, I jest, but you get the idea

When it comes to privately owned pawnshops, they generally don’t have the database or infrastructure that the corporate ones do. They rely more on product knowledge and research to price things. This can go either way for the buyer.  Sometimes the shop will go off what items are listed for new, not what they are selling for used. However, the private shops are generally more flexible with pricing.  It may take a little more work to get a lower price, but it can be worth it.  A lot of these owners and managers enjoy the haggling process and enjoy making deals.  Hone your negotiation skills before you go in, but don’t be afraid to walk away. Nothing softens a stance on a price like looking at an item every day that you could have sold for a little less.  You may need some persistence and patience with this.

These private shops are more common in smaller towns. They often will have multiple stores located in different towns in a particular area. This can be advantageous if they are all owned by the same person or company because they can share inventory or check multiple stores for something you are looking for.

I’ll wrap up with my personal tips for getting the best deals at Pawnshop regardless of the type

  • Become a regular. Making regular appearances and purchases will help with your bargaining position.  I even have managers that will call me if they get a particular item they think I will be interested in.
  • Cash is king- you will generally get a better deal if you are paying cash.  The store can avoid the credit card fees and may pass those savings on to you.
  • After you negotiate the best price, ask for that to be the “out the door price.” This means the store covers the tax and can be an additional 7% or more discount.  Cash can make this easier.
  • Establish product knowledge. Become an expert on items you are interested in. Know how to test them and ensure they work. Know the value and what they sell for new and used. Teach the employee something about the product they didn’t know, but don’t be an ass about it. Helping them by passing on knowledge can help build rapport. A good rapport with the employees can only help with deals and prices.

A few notes on safety:

  • Be careful to not use a tool that is malfunctioning or has a defect that would be a safety issue.
  • Don’t put yourself in compromising situations and beware of scams or stolen merchandise.
  • Learn to use a tool before you operate it.  You should take the time to educate yourself on a tool prior to operating it.  Failure to do so could have permanent and life-changing consequences. 
  • Learn what PPE(Personal Protective Equipment) is necessary for each tool and use it!

So now you know and knowing is half the battle! Now go out there and get those deals!

Keep making and stay awesome,

Pete

seven rules for tools

1.      Power tools just allow you to do something faster, not something new. .

  • They are not a requirement; they just speed up the process. There are exceptions, but this is generally true
  • The main thing here is to not let yourself be limited by tools you don’t have
  • Hand tools may not be ideal, but you can accomplish a lot with some patience and a good set of hand tools

2.      The more expensive the tool, the higher the quality, accuracy, and/or capacity.

  • Ensure you know which ones you are paying for, and it meets your needs.
  • A larger lower quality tool and a smaller higher quality tool can cost the same amount. Make sure you are spending the money where it matters to you
  • Bigger is not always better but is almost always more expensive.

3.      A tool you need once is not a tool you need to buy.

  • These will take funds away from tools you will get regular use out of and clutter your workspace. Borrow, rent, or pay someone else to do it for you
  • Space, time, and money are all limited resources for us makers. A tool you spend money on is one you have to store and make space for. Ensure it actually saves you enough time to make it worth it
  • Jointers are one of the main tools that fit this category. A lot of people buy a jointer for one project and never touch it again. If that is you, buy planed lumber or find someone to do it on those rare occasions you need it. This example applies to multiple tools

4.      When it comes to cordless, loyalty is the word.

  • Mixing and matching brands reduce efficiency and are not cost or space effectively. Sticking with one brand allows the sharing of batteries and chargers, which reduces how many you need to own. It also allows for buying “tool only” items which are generally less expensive
  • Look into the different tool brand offerings. Figure out which brand fits your needs and commit
  • In addition to not having to charge and store multiple types of batteries, you will have to carry less with you to your work. When building my closet I needed multiple tools: a drill/driver, nail gun, vacuum, multi-tool, and a reciprocating saw. I took all of those tools and two batteries. I ended up only needing one

5.      Take care of your tools and they will take care of you.

  • This sounds cliché, but it is the truth. This means performing periodic maintenance as directed by the manufacturer, storing them properly, and using them as designed
  • Familiarize yourself with what your tools need to stay in tip-top shape and keep up with it. Also, keep those items on hand.
  • This includes replacing and sharpening blades. A new blade can bring a saw back to life. It will also allow you to get more miles out of your saws

6.      Modify and customize.

  • Building stations and improvements that help tools improve can be like getting a whole new tool
  • A crosscut sled for your table saw or putting your miter saw into a station can greatly improve tool efficiency
  • There are also a ton of jigs with various purposes that can increase your capabilities and output

7.      The most important tool is you!

  • It is the absolute truth, and you should protect yourself as such
  • This means using the proper PPE. A split-second incident can be life-changing, protect yourself before you wreck yourself
  • Safety glasses, gloves, close-toed shoes, and push blocks are a good start
  • Lastly, while knowing what to wear is part of it, knowing what not to wear is just as much a part of it. While long-sleeve, loose-fitting clothing and gloves are great while putting in insulation, you would want to avoid those when working with a drill press or other rotating equipment that could suck them in

Hopefully, these 7 rules help to build and maintain your tool collection. Keep in mind that any tool you can enhance to improve production or maintain to extend its life, is one less too you have to replace. Those are dollars that can go toward new tools and projects!

Keep making and stay awesome,

Pete

The best tool you aren’t using

Or maybe you are. The tool I am talking about is the 3d printer. Load a file, produce an item. Well, there is more to it than that, but that is the basic idea. The 3d printer is still somewhat in its infancy and it is evolving at a crazy rate. There is a learning curve with 3d printing, I am still learning it all myself. The key is to not be intimidated and keep educating yourself as these things are not going anywhere. Soon, we could be getting files from manufacturers to print replacement parts for their products rather than waiting on them to mail a replacement out, we are not quite there yet though. 3d printing offers us the ability to design and produce items tailor-made for our applications, prototype our creations, and reproduce things with relatively little cost and effort. This isn’t intended to be an exhaustive review of 3d printing, but just a brief and simplified overview, we will get into more specifics in later posts.

As far as the printers go, there are a ton of options. You can build your own, buy a kit and assemble it yourself, or get one that is almost ready to print straight out of the box. There are other options like services that will assemble kits and install upgrades, but I am getting into the weeds. Price pretty much scales with the size each printer is capable of printing within the printer types. Currently, at the consumer level, there are two main types: FDM and Resin. Without getting too technical, FDM melts plastic filament and builds it up layer by layer. Resin printers (for which there are many different types, most commonly DLP and SLA) dip a plate into liquid resin and cure a layer with a specific method, and it repeats this for each layer. There are other types, but these are the most common and for this post, we will focus on these.

FDM printers are generally less expensive relative to the size of the build area. There are many different materials to choose from, each with its own properties, applications, and settings required to use. PLA and ABS are two common materials and they generally come in 1kg spools of various colors. Resin printers have a higher resolution and can capture greater detail. The resin comes in 1L bottles and is available in various colors and levels of transparency.

The instructions for the print are generated from models and converted to a tool path in the form of code the printers can understand. If you are capable of drawing your own models, then you are ahead of the curve. If not, then there are tons of sites and creators providing free files online. Some groups and artists sell files or can be hired to create custom files. The cost of files depends on the complexity and time invested. For getting started and learning the ropes, the free files are great.

A big part of printing is breaking up the file, or slicing, it so the tool path or code can be generated. Orientation is a big part of this and will differ based on the media used to print and the purpose of the print. For example, if the printed part will be under stress and will be printed on an FDM printer, you would want the force to be applied perpendicularly to the layer lines if possible. Think of wood and the layers being grain. Depending on the size of your print bed and the orientation of the print, your model will commonly have to be broken up into multiple pieces and print sessions to be assembled after printing. My first printer had a build area of only 9” x 6” and I have been able to print some pretty large models.

I know this has been a quick, very high-level introduction to the 3d printing process, but it was only meant to dip our toes in the water and see that it should not be intimidating. It should be looked at as just another tool in our toolbox. There is far more to 3d printing. We will explore the aspects of 3d printing and take an even deeper look at those in future posts. Until then, stay awesome and keep making!

Pete

Six great tool sources for makers getting started

I shared one of my favorite sayings in my last post, and it applies to this one as well. The source for a particular tool will depend on your priorities (good, fast, or cheap), and remember you get to pick two in most cases.  Each of these has its advantages and trade-offs. Identifying those will help guide you as to where the best place is to hunt down some new tools. For instance, I am currently on the hunt for a stand-up drill press. I currently have a benchtop drill press, so I don’t HAVE TO have it right now, as in I don’t need it fast. This allows me to focus on good and cheap. Good and cheap will lead me to used sources like pawnshops, estate sales, and craigslist. I can take my time and get the best deal on the best tool I can find. Below are six of my favorite sources I use to acquire my tools.

Family and Friends are the ones we turn to when we need help, why would it be any different with tools?

My go-to source, first and foremost, is family and friends. Most of us have more than we need.  We have stuff we bought, used once, o never used, and it went to the back of the closet.  Tools are one of the items that fall into this category, and it applies even more to specialty tols.  People get inspired, buy all the tools, and jump into a project or new hobby only to lose interest for one reason or another.  A lot of those tools go to storage and are never thought of again

I talk to my family and friends about projects I’m working on all the time.  I’ll mention that I’m looking for a specific tool or tools in general. Fairly often they volunteer information about unused tools they are aware of. They say something to the effect of, “I think I have one of those in the garage I don’t use” or “<insert husband/wife/son/daughter/friend’s> name bought one of those years ago and never uses it, you should ask them about it.” Offer to buy it. Sometimes they will give it to you and be happy just to help you out.  It also helps them because they are happy to see the item go, get rid of some clutter, and free up some space. Even if they want to sell it, it will most likely be substantially less than what you would pay for it from other sources.

Talk to other makers. Makers have the best tools!

For specialty tools, you might look to other makers. Makers are constantly buying and upgrading tools.  Upgrading tools is like an addiction!  Some of us just must have the most up to date model or newest gadget. I’m guilty of this occasionally–it happens!  Those perfectly good older models of tools or items that have been replaced end up on a shelf or in the back of a drawer, and shop space is at a premium!  When I do a deep clean of the shop, I find tools that have a small issue or were replaced, and I just don’t use any more.  I generally offer them up to my friends and family because I just don’t feel like haggling with people on Craigslist, and because it helps my friends out!

Ask other makers that you know at local shops.  Maybe they have a tool with a small issue you can fix or live with.  A quick YouTube or Google search could surprise you at how easy it is to make certain tool repairs yourself!  Makers like to help out other makers generally speaking and this can also get a good dialogue going.

Retail store sales/coupons: it is a waiting game, but it can pay off, especially around the holidays

When you need to go retail, try to wait for a sale, the big box stores(Home Depot, Lowe’s, etc,) run good combo sales around Christmas time and other holidays.  Great deals can be found on battery packs, tool kits, and combos.  I generally buy at least one multipack of batteries for the brands I use every year.  With a lot of brands going tool only, this gives more flexibility to select the tools and batteries that are more geared towards your particular uses in an “a la carte” fashion.

Another thing the big box stores do during their Christmas sale is offer combo and bonus deals: “buy this 5-tool combo and select two of these other tools free” or some variation of this.  These offers give you more customization to your purchase, so you’re able to get what really works for you.

Discount stores (like Harbor Freight) may not be known for quality, but they can be a good source when you’re priority is to save money!  I buy from discount stores when I am not particularly concerned with quality or accuracy, and I want to spare my expensive tools.  Consumables like gloves, masks, drop cloths, etc. are other items that HF is a good source for.  They run ads regularly and have coupons to even further reduce the prices.  I can’t speak for a lot of the power tools and have heard mixed reviews.  It generally seems pretty hit or miss.  I do have friends that run their HF tools until they die, return them, and repeat.  It isn’t a bad option to start with on a budget and upgrade as you grow.

Pawnshops/thrift stores: Bad reputations. Good deals.

Probably the most intimidating source for buying tools is the pawnshop. pawnshops get a bad rap, maybe some of it is warranted. I worked at pawnshops for years and learned a ton which I’m happy to share.  First thing is that there are two types of shops and they are fairly different: Corporate stores (Cash America, EZPawn, etc) and then the local, privately-owned shops. I will tackle the differences between these two in a future post and give some tips.

Craigslist/Facebook Marketplace

Just because I don’t like selling things on Craigslist doesn’t mean I don’t like buying from there.  There is a lot of junk for sale on there, but there are also deals to be had. With the internet, people are generally aware of what things are worth.  Like pawnshops, product knowledge is your friend here.  You can run into some of the same issues where people overvalue their items, but what you want to find is where the seller NEEDS to get rid of the item.  Maybe they have a bill due, are trying to clean out the garage, or the item was a gift from an ex.  It doesn’t matter to you; they are looking for a quick sale and that does matter.  Just be smart about it.

Estate sales/Auctions/Liquidations

A lot of people that shop these do so with the intent of reselling items.  They generally have more resources to buy but must leave enough room to make a return on the item.  Since you are buying the item to use, you are most likely willing to pay more than the reseller.  Again, product knowledge is key.  Some of these will list the items with pictures online before the sale.  Get an idea of what items you are interested in and do your homework.  Familiarize yourself with what types of payments are accepted and show up early!

Be creative, be resourceful

The key to all of this tool hunting is the same as designing and completing projects. It is all about using your creativity, using the resources available to you, and a little bit of luck. I will expand on a few of these in a future post to give more tips and tricks on how to get the most out of them. Until then, stay awesome!

Pete


SHOP TALK: my approach to setting up my workspace

Hello makers!  I want to preface this with a funny little comment I like related to production and construction, “You can do it good, fast, or cheap, and you get to pick two.” While humorous, it is very accurate when you think about it. My point here is, if you don’t have the money for an awesome space or the best tools right now, you can still produce amazing products. In that case, you choose good and cheap, but not fast. My point is to not be discouraged by what is currently unavailable.

One of the main considerations when it comes to making things is a space to work in. When I first started making, it was in my yard and on my porch. It was doable and projects got finished, but it was slow, like half the speed of smell slow. The first hour was set up and the last hour was tear down. Between losing an hour on each end of my day and runs to the hardware store, it was tough sledding.

Looking at shop setup with growth in mind

Fast forward to today and I have a shop that is well on its way to becoming a dream workspace. While I doubt it will ever be actually finished, I think that is the point of a workshop. It should be ever-evolving. As you work in it more and more, your workflows evolve, you develop new skills and techniques, and acquire new tools. Maybe your direction changes. I just bought a few tools from a guy who was moving towards small, handcrafted projects and away from the large-scale cabinets and remodeling. Either way, the point is your shop is never complete, it should continually grow with you.

Two workspaces, one goal

Back to my shop. With the above in mind, I designed my shop to be flexible and grow with me. The cabinets and stations are all modular. They can be lifted off the walls and placed in different locations with the use of French cleats. I ran all the electrical in metal conduit to give me the flexibility to add to later and have set up a system to make the other utilities easily modifiable. I have plans to put multiple tools, that I do not use regularly, on flip-up carts that can easily be stored out the way. This shop is designed to handle anything that generates dust or debris. We are currently in the process of converting our garage into a second shop which will handle everything that does not generate debris, a clean shop.

The clean shop will also use the modular approach. The same style carts will be used but will have storage below instead of tools. The carts will be able to be connected to provide different configurations of workspaces based on project needs. We have three 3d printers, a vinyl cutter, and various other machines. Leatherwork, sewing, 3d printing, etc will be housed in this space. Eventually, we hope to add a laser, but we need to get it up and running first.

The idea is the two spaces will work together to produce some really cool projects. The flexibility will give us many more options when tackling a project or problem. Having the spaces separated should also save time by greatly reducing setup and teardown time. We will document the progress on the shops here and hopefully, our ideas will help inspire you.